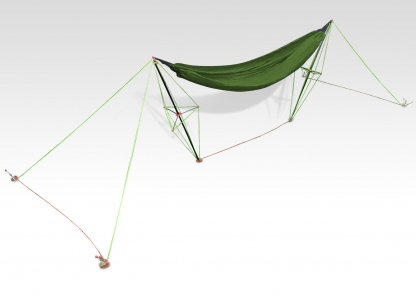
Handy Hammock Website Photo
|
Manufacturer: Handy Hammock Product:Green Handy Hammock (2012) MSRP: 99.99 British Pounds ($160.50 USD on 6 Jan 13) Website: http://www.handyhammock.co.uk/ |
|
PRODUCT DESCRIPTION:
Not every location is good for hammocking, but hammock stands are not always feasible - they're usually bulky and heavy, so they don't fit every trip. Enter the Handy Hammock! Using tensegrity principles, the Handy Hammock offers a very lightweight hammock stand in a small package that needs only suitable ground to hold the stakes. Jason at Handy Hammock sent me one to test, and I'll post updates here as I get more experience.
Discuss this review HERE.
| Handy Hammock - Initial Review 6 January 2013 |
|
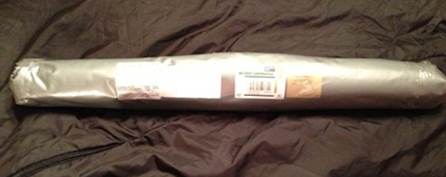 |
The package arrived wrapped in a very heavy duty plastic bag that was zip-tied on the ends and taped shut. It appeared protected from most handling it would receive during shipment.
The package includes one green hammock, one stuffsack, two folding struts, four guylines, twelve stakes, six base-plates and an instruction manual. |
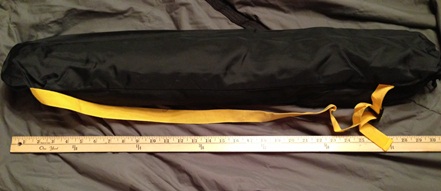 |
The entire package fits inside a stuffsack about 30" long and 5.5" diameter, with a cordlock closure and a yellow webbing shoulder strap. The entire package weighs 3 lbs 3-5/8 oz (1464 g). (My scale is accurate to 1/8 oz and 2 g, so my measured weight may not match the ounces-grams conversion calculation.) The stuffsack alone weighs 1-7/8 oz (52 g). |
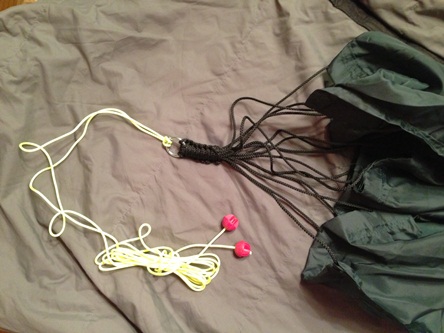 |
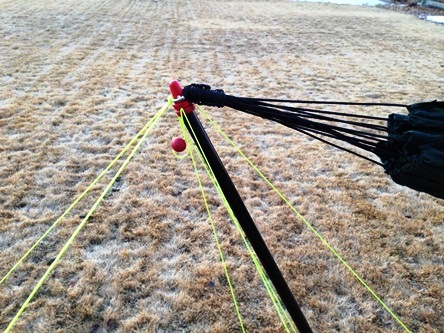
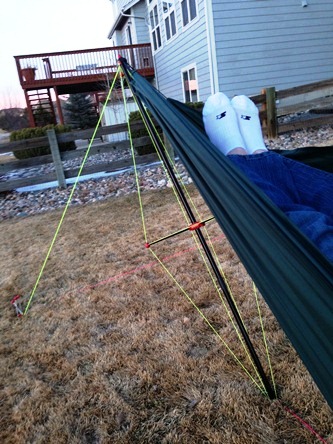
The hammock body appears to be 1.5osy (ounce per square yard) taffeta and the fabric measures 92"x56". It has a rolled hem on the long edges, and the short edges have larger rolled hems with holes at intervals for the cordage that supports the hammock. The cordage will extend the effective length of the hammock to 114". This is just a bit shorter and narrower than the gathered end hammocks I normally use, so I'll be interested to see how this affects comfort. The black cordage that is threaded through the hem is attached to a metal ring at the other end. During setup, this ring is slipped over top of the pole. The yellow cord larksheaded to the other side of the ring creates the hammock's guylines. The red balls at the far end of the yellow cord fit through the pink ground plates. (More on that in the next report.) This hammock does not include a bug net. The hammock body with the cordage seen here (on both ends) weighs 12-1/8 oz (342 g). |
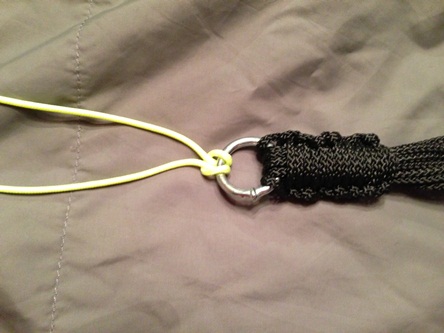 |
Here's a closeup of the metal ring. This concerns me a bit because it's welded, and common practice in the U.S. is to use only climbing-rated rings - which are not welded. This ring does not support weight directly like in the ring-buckle setup, so it does not handle the same stresses, so it may be more than adequate. Time will tell. |
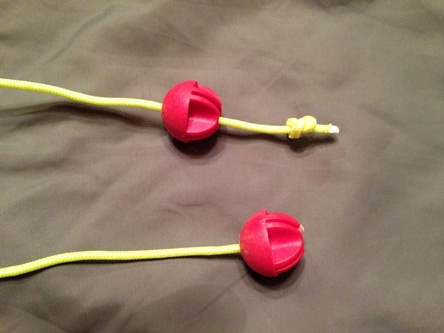 |
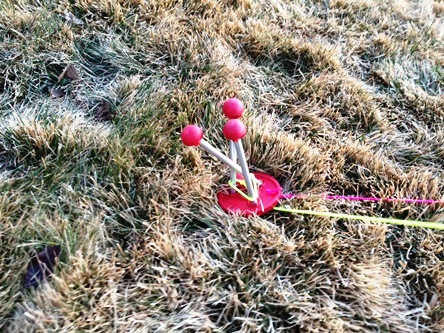
These red balls will thread through the holes on the ground plates (next picture). Since each end will have two guylines, four of these balls will support the occupant's weight. I'm interested in how much force will be on each ball, or if the friction of the cord threading through the ground plates and stakes reduces the amount of force directly on the ball. |
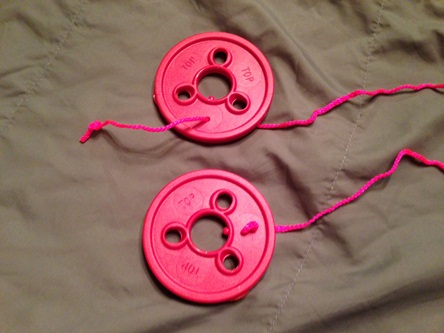 |
The package contains three sets of these ground plates. One set is two plates with the string conecting them. The purpose of the pink string appears to be setting the correct distance between guylines, and they will not bear any load. Each set of ground plates weighs 1-3/8 oz (38 g). |
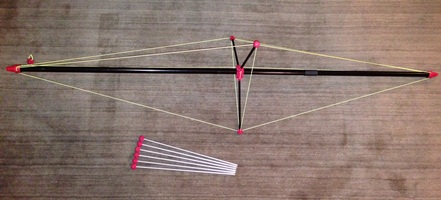 |
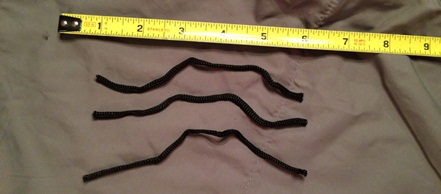
The pole comes in two aluminum sections with shockcord holding them together. At first glance, this seems like a tangled mess! But once I realized that the stakes slide out of the center piece, it was easy. Just unfold the poles and slide them together. Next, pushing the centerpiece towards the middle of the poles extended the triangle and I began to see how strong this setup will be. Locking the red ball through a loop at the other end of the pole (next picture) completes this portion of the setup. When set up, each pole measures 54.5" tall and weighs 10-1/4 oz (290 g). Each stake measures 13-1/8" and weighs 1-1/8 oz (32 g), and six are required per end. That means each end of the stand (minus the hammock and attached guylines) weighs 16-7/8 oz (478 g). |
 |
This detail shows how locking the ball through a loop at the top of the pole locks the centerpiece into place. |
 |
Six stakes and one pole assembly are required to support each end of the hammock, and the stakes all fit into the centerpiece for storage. This is genius! It's a great way to keep everything organized, and you'll know you've forgotten a stake during takedown if one of the holes is empty. |
 |
So far so good. The only thing that concerns me is these three 6" lengths of string. I'm not sure if they're scraps or if they should be used for something, and I can't find them mentioned in the instructions. Normally not a big deal - just a few strings - but this is the first stand of this type I've ever used and don't want to do something wrong! The setup appears solid already, though...I assume these are just for tying the poles together when I pack it all up. |
| First Impression - I'm very impressed with this piece of kit! So far, it appears to be a well-executed design that addresses an empty niche in the hammocking market...a lightweight, low-bulk hammock stand.
Whenever I get a new piece of gear, I test how intuitive it is by trying to set it up without reading the instructions. I was able to figure out the pole assembly, but I couldn't get any further without instructions (i.e., attaching the hammock and staking out the guylines). This gear is a little more complicated than most, but it comes with very clear instructions with several pictures. While setup appears somewhat complicated, I expect to need the instructions only one or two times before I master the setup. Like I said, a well-executed design that will allow me to substitute skill and intelligence for more gear and weight. I'm curious why the manufacturer chose to use cordage ends rather than simply gathering the ends of the fabric together. Obviously this would require a longer piece of fabric for the body, but it would also eliminate any chance of tangling the cordage at the ends - which has happened to me with every corded-end hammock I've used - and would likely require less time in production...hopefully leading to lower costs. Weight would be very similar. Perhaps the answer will come with more experience in use. Questions I will try to answer during testing phase:
|
|
| Handy Hammock - First Setup 8 January 2013 |
|
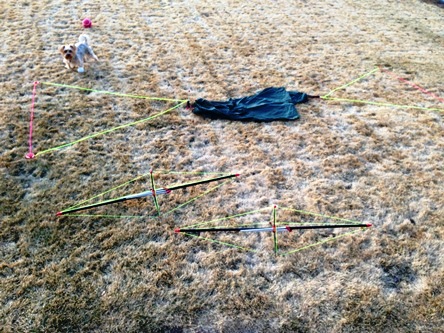 |
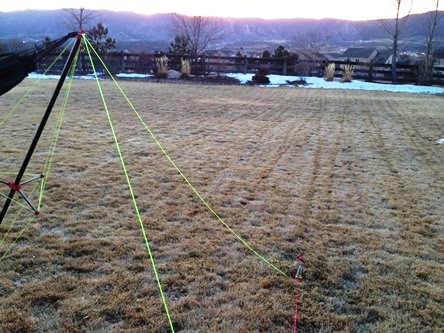
The instructions are pretty easy to follow. The lengths of cord between the components ensure the proper geometry - this is what it looks like all laid out but not yet staked down. This brings up one point I'll have to address in the future. I don't like laying the hammock on the ground during setup! I'll probably just use a removable ridgeline with the rings for setup, then clip the hammock on after the stand is raised. |
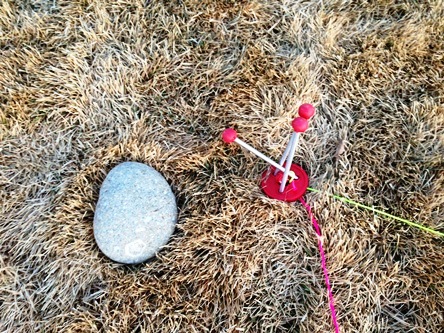 |
Here's how the corners are staked down. The ground is cold but not frozen, but I still needed a rock to get the stakes in far enough. This is the only slightly complicated part of the instructions...the instructions direct that the stakes be put in a certain order and at a certain angle, and then the cord is wrapped around the stakes and the button tucked under to hold it all in place. (This picture is before I wrapped the cord around the stakes.) Using three stakes with the base plate, and the cord threaded thru the plate and around the stakes, greatly increases the holding power supporting each guyline. As long as the soil is suitable, this seems to be a very good way to get a lot of strength without a lot of heavy gear. (Heavy relative to hammock stands, not to ultralight hiking, obviously.) |
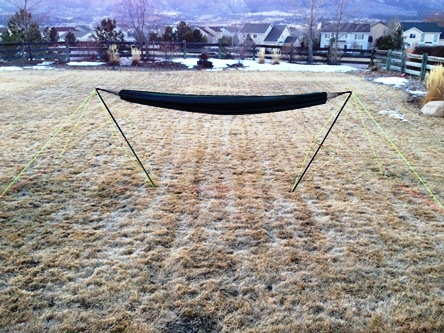 |
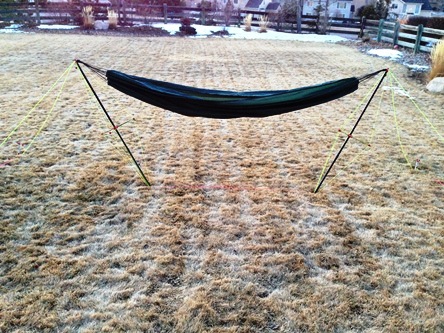
Once the stakes were in, I simply put one end of a strut inside the baseplate and the other end inside the metal ring on the hammock guylines...then held the hammock up while I did the same at the other end. Pretty simple. So here's the hammock all set up. It's pretty tight, but the system will settle, and the hammock is new so I expect the fabric to stretch the first few times. If you follow the geometry set by the cords every time, there's really no way to adjust the hammock's sag, the distance between the struts to allow different hammocks, etc. However, it would be pretty easy to lengthen the center baseplate setup to allow longer hammocks. Basically, the height of the struts is roughly set, but the distance between the struts can change. The affect of this change would be somewhat limited, though...if you want to maintain a roughly 30* angle for the hammock supports, there's only a little room for adjustment before the hammock would hit the ground. I think there's enough room for the Warbonnet Blackbird and Hennessy Backpacker, but I'll test to be sure. I'm really interested in seeing how it will work with the Warbonnet RidgeRunner, though! The angles are different on a bridge-style hammock. |
 |
Here's a close-up of the strut in use. You can see where the hammock is on one side of the metal ring and the guylines come off the other side. This channels most of the force into compressing the strut; aluminum has a high compression strength, and the rest of the assembly stabilizes the forces so they remain mostly inline with the strut. Great design. |
 |
And a close-up of the baseplate when the hammock is set up. |
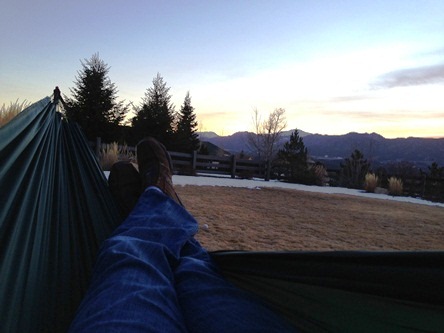 |
And...success! I got in gently, then swung and bounced a bit, and it seemed very stable...so I laid down. Pretty comfortable! (You can see Pikes Peak and the Air Force Academy in the background.) As I mentioned in the IR, this hammock has smaller dimensions than most of my hammocks. Even so, I think it would be pretty comfortable if I could give it more sag. Adding sag should be as simple as moving the struts closer together, but I didn't have time before the sun went down. |
 |
Close-up of the strut and baseplate while I was in the hammock. As the instructions predicted, the setup will settle once it's weighted (just like hanging a hammock from trees). In this case, the struts sunk into the ground a little, but the baseplate stops it from going in too far. I'll be interesting in seeing if sand causes it to sink too far, or if hard ground allows the struts to slip. |
 |
And a close-up of the strut with the hammock weighted. |
|
 |
| Above on the left is the hammock immediately after setup, and on the right is the hammock after being occupied for about 10 minutes. Compare the sag. I think the fabric will stretch a bit for the first several uses, but the system will always settle after setup - the stakes will pull out of the ground a little, the struts/baseplate will sink into the ground a little, etc. - which moves the tops of the struts closer together and creates more sag. |
|
 |
Look at the curve in the far guyline...this was tight at first setup, and the slack is the impact of the system settling. I'd expect most of the slack to occur when the hammock is first occupied, but I'll be interested in seeing how much additional settling occurs overnight. |
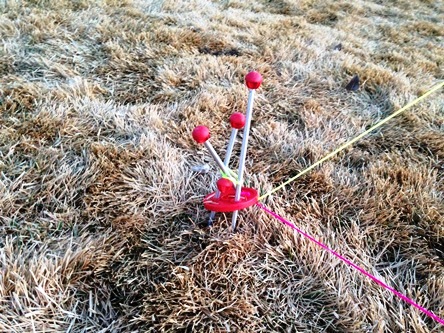 |
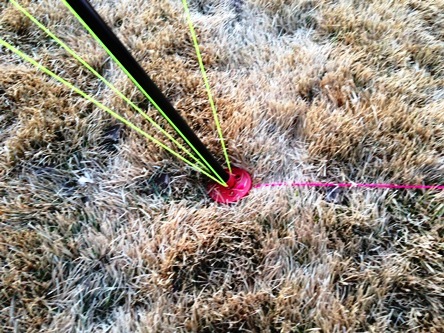
Here's the baseplate after settling. It was on the ground at setup, but weighting the hammock creates a force (with a vector along the guyline) that lifts the disc off the ground. |
| Overall, I'm still very impressed with this system. The instructions are very clear, although setup is just complicated enough that I needed them. I will try to do it next time without looking at the instructions; I think it will be pretty easy. Next up in the testing cycle will be trying the Blackbird, HH Backpacker and RidgeRunner hammocks, and seeing how much settling occurs when occupied overnight. After that, I'll see if I can find different kinds of soils to test it on...maybe a trip to the Great Sand Dunes National Park! |
|