How Do I Hang My Hammock?
-
Table of Contents
- Introduction
- Cord-Based Systems
- Webbing-Based Systems
- Advanced Hanging Techniques
Hanging Two Hammocks
Pic by FreeTheWeasel
Just Jeff's Outdoors Page"Going to the woods is going home, for I suppose we came from the woods originally." ~John Muir |
|
|
Hanging Two Hammocks
Pic by FreeTheWeasel
| 1. Introduction. |
The purpose of hammock suspension is to support the hammock safely without damaging the environment. Everything else - low weight, bulk, complexity and expense - are secondary concerns.
Now let's break this apart:
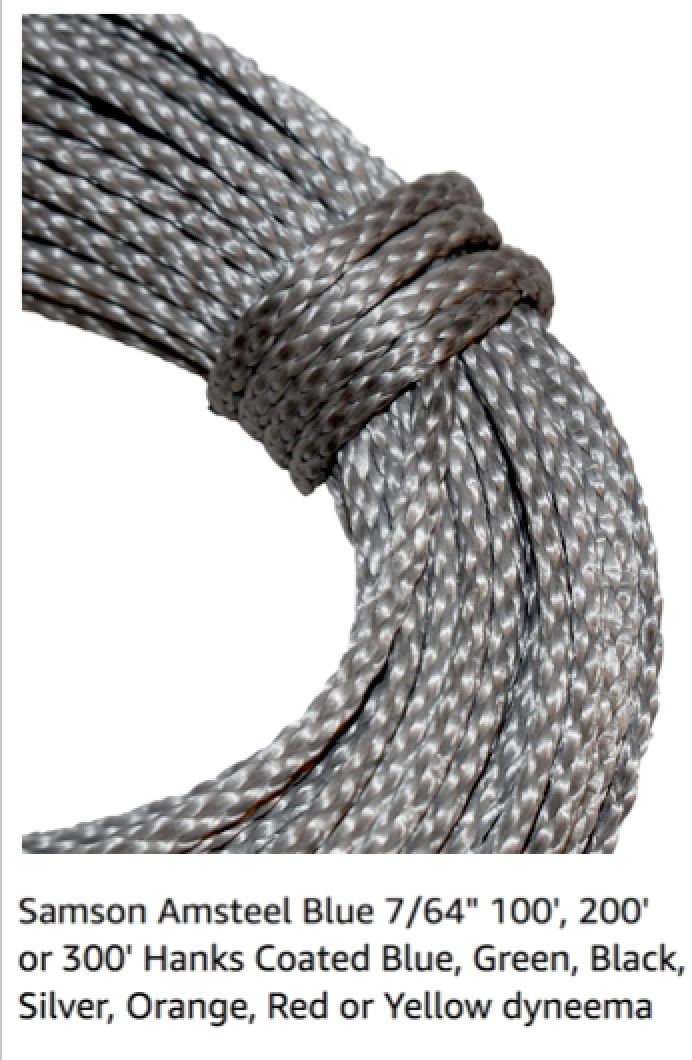
Materials are another consideration. Suspension is usually made from low-memory stretch cord like Spectra or polyester or polypropylene webbing. Low-memory stretch means that, once the material is stretched out from you laying in it, it doesn't remember how to pull back to its original position...it stays stretched out so your hammock doesn't end up on the ground every morning. High-memory stretch material like nylon pulls back to its original position...so you'll end up hanging much lower every morning than you started the previous night. Paracord (550 cord) is made from nylon so it can stretch to absorb opening shock...in addition to not being strong enough, it stretches too much to be an effective hammock support. Slap Straps by Eagles Nest Outfitters are currently made from nylon...many hammockers have tried and discarded this approach because of this. If you like the system, make your own from polyester or polypro webbing.
Two Key Decisions. There are two key decisions to make for your suspension.
Each of these will be discussed in the following sections.
| 2. Cord-Based Systems. |
Cord-based systems use rope or cord to connect the hammock to the tree. As discussed above, some method must be used to ensure the system does not damage the tree. This is usually tree huggers like the ones included Hennessy Hammocks products. Tree huggers are simply 1-1.5" wide lengths of webbing with loops at each end. The length needed depends on how big the trees are where you hike. You can get longer tree huggers as an option on the Hennessy website, from Strapworks, or make your own.
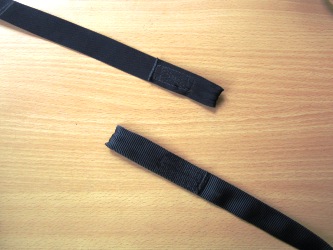
I needed longer huggers so I made the ones on the right. I used 1" nylon webbing for a finished length of 52". The stock Hennessy tree huggers (Backpacker model) are on the left for comparison. Ignore the no-tail cat.
Nylon is ok to use for huggers because there isn't much room to stretch (compared to the full length of the support).
Sometimes I'll take one long hugger and one short hugger so I'm more prepared for bigger trees. Other times, I'll just bring an extra hugger so I can combine it with whichever end needs more length. Instructions for that here.
| 2.1. Connecting Cordage to Hammock |
 This picture of a Hennessy Explorer Ultralight shows an example of permanently attached systems. These aren't designed to be changed, but many people do change them. Under the cover the hammock is whipped, with a special way to attach the structural ridgeline. This picture of a Hennessy Explorer Ultralight shows an example of permanently attached systems. These aren't designed to be changed, but many people do change them. Under the cover the hammock is whipped, with a special way to attach the structural ridgeline.See pictures of the Hennessy whipping being deconstructed here. |
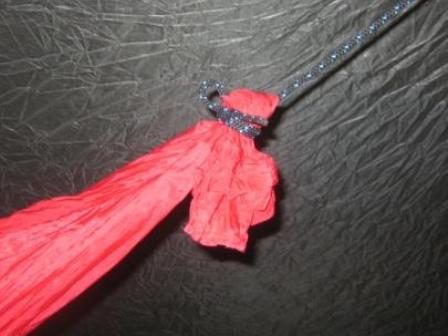
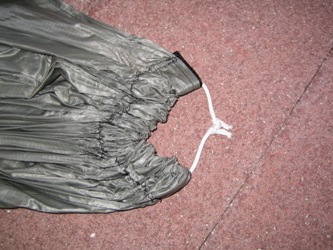
 A larkshead or girth hitch is one of the simplest methods of attaching webbing or cord to a hammock. See the detail below for how to make this system with cords. The weighted hammock keeps the hitch tight. A larkshead or girth hitch is one of the simplest methods of attaching webbing or cord to a hammock. See the detail below for how to make this system with cords. The weighted hammock keeps the hitch tight. |
 A double sheetbend is used to connect two lines together, often when they're different sizes. This works well for connecting hammocks to suspension lines, whether it's cord or webbing. This picture shows a slippery double sheetbend on a homemade two-layer hammock, with Spectra as the support. Double sheetbends are advantageous because the hammock doesn't have to be whipped first and, if you make it slippery, it's easy to remove if you want to change something. But they also take more of the hammock's length than whipping and a larkshead. If you plan to use a double sheetbend, add an extra 8-12" to your hammock body length to account for the knot. A double sheetbend is used to connect two lines together, often when they're different sizes. This works well for connecting hammocks to suspension lines, whether it's cord or webbing. This picture shows a slippery double sheetbend on a homemade two-layer hammock, with Spectra as the support. Double sheetbends are advantageous because the hammock doesn't have to be whipped first and, if you make it slippery, it's easy to remove if you want to change something. But they also take more of the hammock's length than whipping and a larkshead. If you plan to use a double sheetbend, add an extra 8-12" to your hammock body length to account for the knot. |
 You can also run a cord thru a channel sewn into the hem of the hammock. This puts all the force of the support onto a sewn seam, so it seems like it introduces unnecessary risk of failure when there are stronger methods available. Still, some commercial hammocks, like Eagles Nest Outfitters, use this method and I haven't heard of any failures at the channel. You can also run a cord thru a channel sewn into the hem of the hammock. This puts all the force of the support onto a sewn seam, so it seems like it introduces unnecessary risk of failure when there are stronger methods available. Still, some commercial hammocks, like Eagles Nest Outfitters, use this method and I haven't heard of any failures at the channel. |
| 2.2. Connecting Cordage to Tree |
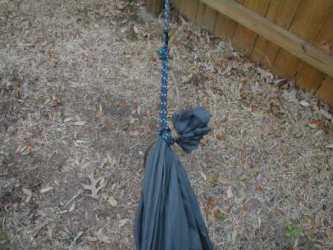
 This is the standard Figure-8 Lashing detailed on the Hennessy Hammock stuffsack and website. It's also called a Lineman's Knot or Lash, and hammockers often call it the Hennessy Lash. It's pretty easy to tie once you learn it...much simpler than it appears from this picture. You can see a video of how to tie this on on the Hennessy website and on Shane Steinkamp's page. This is the standard Figure-8 Lashing detailed on the Hennessy Hammock stuffsack and website. It's also called a Lineman's Knot or Lash, and hammockers often call it the Hennessy Lash. It's pretty easy to tie once you learn it...much simpler than it appears from this picture. You can see a video of how to tie this on on the Hennessy website and on Shane Steinkamp's page.The major benefit to this method is weight and simplicity - it's probably the lightest method and it doesn't require any hardware to break or malfunction. The downsides are that it's a bit of a hassle to learn, to make a small adjustment you have to redo the entire lashing, and since the tree huggers are separate they can be forgotten on the tree. |
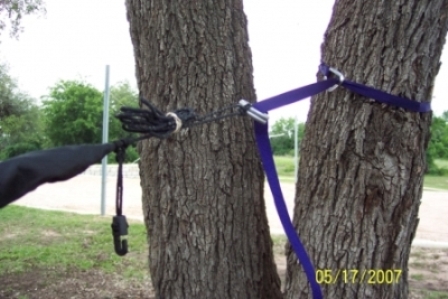
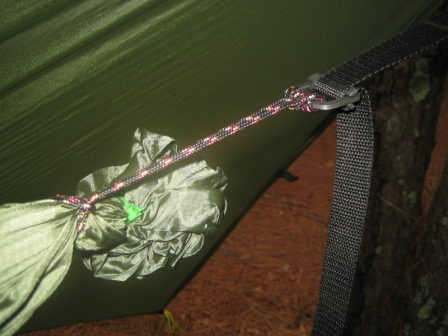
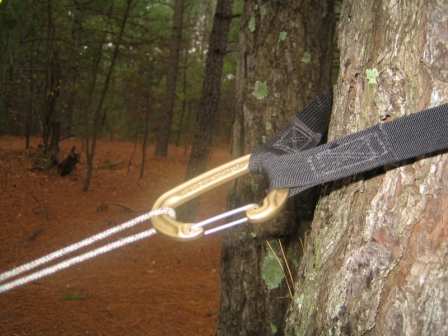 Some folks use carabiners in their setup to make things quicker, at the cost of a little bit of weight. This picture is from a Garda Hitch setup on a Hennessy Hammock, detailed below. Some folks use carabiners in their setup to make things quicker, at the cost of a little bit of weight. This picture is from a Garda Hitch setup on a Hennessy Hammock, detailed below.Using carabiners quickens setup, but it can also keep the entire setup in one piece so you don't forget the tree huggers when you break camp. |
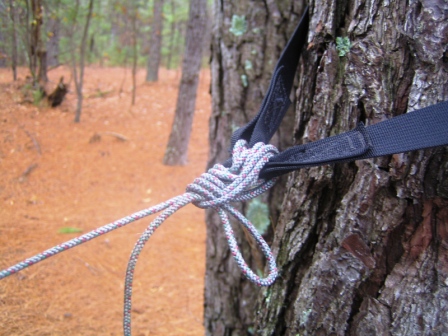
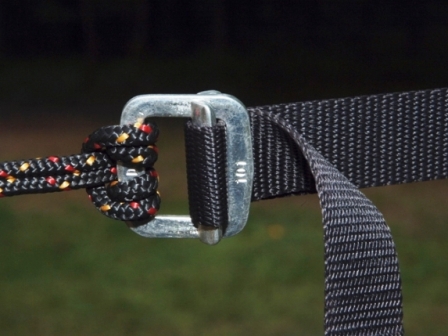
 Here's another simple way to use a biner. Put a carabiner on the tree huggers, then just a 'double slip knot' in the Spectra. It's basically a half-hitch inside a half-hitch. It holds and it's quicker to tie and adjust than the Hennessy hitch. Here's another simple way to use a biner. Put a carabiner on the tree huggers, then just a 'double slip knot' in the Spectra. It's basically a half-hitch inside a half-hitch. It holds and it's quicker to tie and adjust than the Hennessy hitch. |
| Detail - Combining Tree Huggers |
 Sometimes you get to a campsite and the perfect trees are a little bigger than the tree huggers will fit. In this case, if you've brought an extra hugger you can combine the two into one long strap so it'll fit...and you don't need an additional gear to do it (like a carabiner). I often combine straps like this when I'm hanging my son's hammock next to mine from the same tree. Sometimes you get to a campsite and the perfect trees are a little bigger than the tree huggers will fit. In this case, if you've brought an extra hugger you can combine the two into one long strap so it'll fit...and you don't need an additional gear to do it (like a carabiner). I often combine straps like this when I'm hanging my son's hammock next to mine from the same tree.
First, set the two huggers side by side. Here, the Hennessy is the black one on the left and my homemade one is the dark green one on the right. |
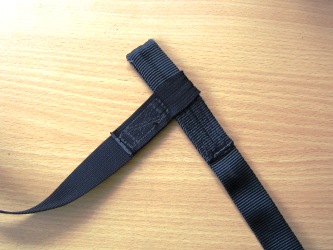 Thread the green one through the loop on the end of the black one. Thread the green one through the loop on the end of the black one. |
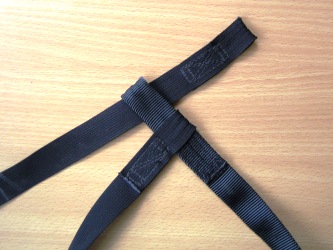 Thread the other end of the black one through the loop on the green one. Thread the other end of the black one through the loop on the green one. |
 Pull it tighter. Pull it tighter.
|
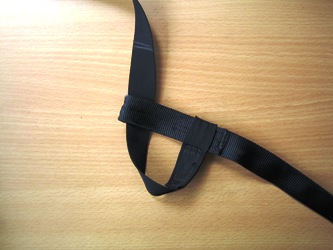
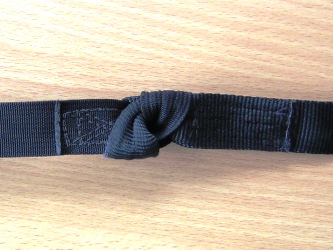 And it should look like this when it's finished. And it should look like this when it's finished.These pull pretty tight when you put weight on them so it can be a bit of a hassle to get them apart, but it's not too bad. |
| 2.3. Garda Hitch with Ring Buckles |
There are several ways to add rings to a hammock to use the Garda Hitch. I have pics of a few of the methods below...have a look and hopefully you'll find it useful in creating your own system. FYI - there are several Garda Hitch threads on Hammock Forums...here's one.
Here's a very easy way that I use for my DIY hammocks.
 Same as above, except it has a prussik adaptor instead of clove hitch. Still no permanent mods to the HH. Instructions on same page as above. Same as above, except it has a prussik adaptor instead of clove hitch. Still no permanent mods to the HH. Instructions on same page as above. |
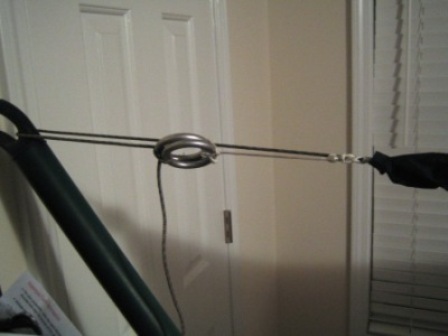
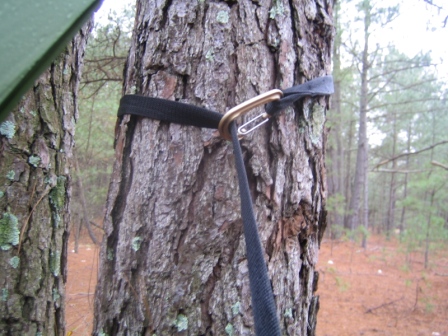
 Here's an option to put ring buckles on the tree hugger. This allows you to use the Garda Hitch on the HH without any mods, and is a very easy way to add rings to a DIY hammock. Just larkshead the spectra to the hammock as shown above, put the rings on the huggers (instructions here), and hang your hammock. Here's an option to put ring buckles on the tree hugger. This allows you to use the Garda Hitch on the HH without any mods, and is a very easy way to add rings to a DIY hammock. Just larkshead the spectra to the hammock as shown above, put the rings on the huggers (instructions here), and hang your hammock. |
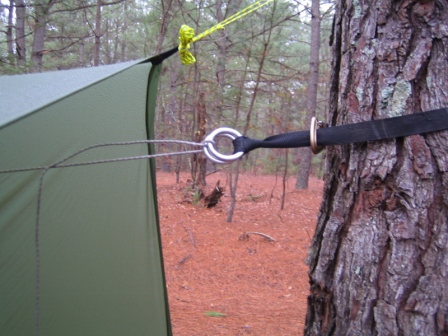
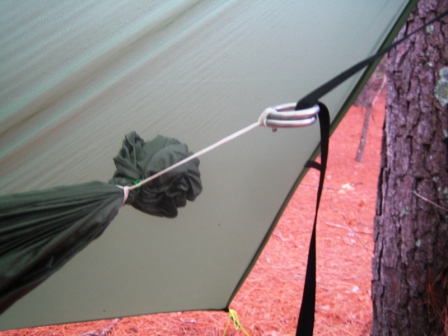
 You can also use ring buckles with a Garda Hitch or with webbing on a bridge hammock. This is the JRB Bear Mountain Bridge Hammock (BMBH). I connected the spectra to the ring on the top of the hammock's suspension triangle with a larkshead, then ran the webbing to the ring buckles attached to the tree hugger as shown here. You can also use ring buckles with a Garda Hitch or with webbing on a bridge hammock. This is the JRB Bear Mountain Bridge Hammock (BMBH). I connected the spectra to the ring on the top of the hammock's suspension triangle with a larkshead, then ran the webbing to the ring buckles attached to the tree hugger as shown here.You can also put the ring buckles at the tip of the suspension triangle if you want to modify your BMBH or make your own DIY bridge. See the Grizzly Adams pictures in the webbing section for more details on this. |
| 3. Webbing-Based Systems. |
Webbing systems can be the simplest suspension to make if you connect directly to the hammock and use the 4-Wrap lashing. Adding in some hardware - like ring buckles, cinch buckles, tri-glides - can make it much more convenient to use, and it is still simple because there are no tree huggers to worry about. Webbing does tend to weigh more and be bulkier than comparable cord-based systems.
Some random notes:
| 3.1. Connecting Webbing to Hammock |
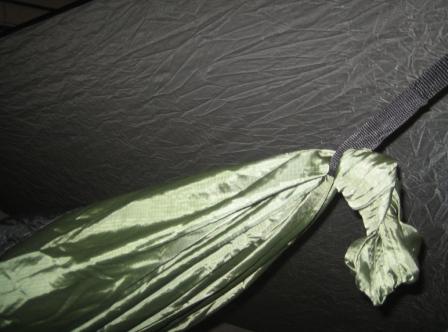
 As I said above, I think the larkshead or girth hitch is one of the simplest methods of attaching webbing or cord to a hammock. For webbing, I have a sewn loop in one end and I just run the free end thru the loop to create the girth hitch that cinches down on the hammock. The weighted hammock keeps the hitch tight. As I said above, I think the larkshead or girth hitch is one of the simplest methods of attaching webbing or cord to a hammock. For webbing, I have a sewn loop in one end and I just run the free end thru the loop to create the girth hitch that cinches down on the hammock. The weighted hammock keeps the hitch tight. |
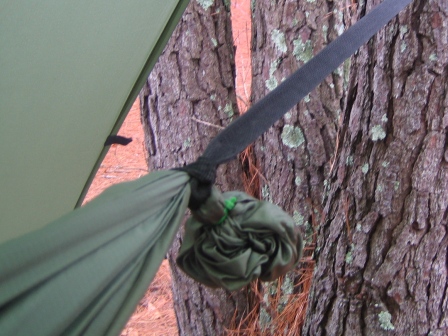
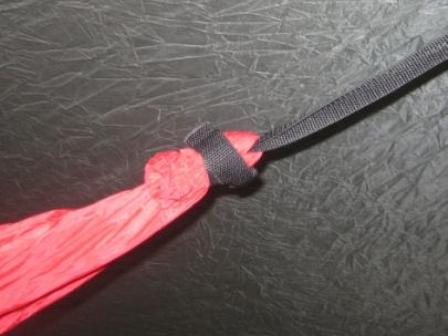
 In his book Hammock Camping, Ed Speer recommends this method for attaching the webbing. After gathering the hammock ends, tie the end of the hammock in an overhand knot. Then wrap the webbing around the hammock and sew a loop into the webbing, small enough that the overhand knot can't slip thru. This method is easy and reliable, and the knot takes the place of whipping. But it is difficult more difficult than the other methods to undo if you want to make changes. In his book Hammock Camping, Ed Speer recommends this method for attaching the webbing. After gathering the hammock ends, tie the end of the hammock in an overhand knot. Then wrap the webbing around the hammock and sew a loop into the webbing, small enough that the overhand knot can't slip thru. This method is easy and reliable, and the knot takes the place of whipping. But it is difficult more difficult than the other methods to undo if you want to make changes. |
 |
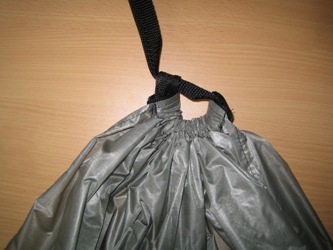
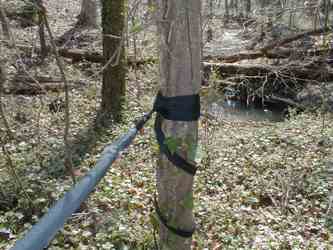
 You can also connect webbing thru a channel sewn to the end of the hammock, like the Crazy Creek pictured here. Two downsides I find with this method...first, all the force of the support is transfered to the seam on the sewn channel. This seems like an unnecessary risk to introduce when there are stronger and lighter methods available. Second, the Crazy Creek method means running two lengths of webbing to the tree, which nearly doubles the weight of the suspension system. You can also connect webbing thru a channel sewn to the end of the hammock, like the Crazy Creek pictured here. Two downsides I find with this method...first, all the force of the support is transfered to the seam on the sewn channel. This seems like an unnecessary risk to introduce when there are stronger and lighter methods available. Second, the Crazy Creek method means running two lengths of webbing to the tree, which nearly doubles the weight of the suspension system. |
 If you like this method, I suggest running the webbing thru the channel and forming a larkshead right at the channel. Then the support only has one piece of webbing running to the tree, which saves weight and complication. If you like this method, I suggest running the webbing thru the channel and forming a larkshead right at the channel. Then the support only has one piece of webbing running to the tree, which saves weight and complication. |
| 3.2. Connecting Webbing to Tree | |
 Running Thru Sewn Loop |
 Biner on Sewn Loop |
 The Speer 4-Wrap method is useful for webbing with a free end that doesn't use any hardware. You basically wrap the webbing around the tree several times, and each wrap adds surface area to create the friction that holds the hammock up. You have to alternate directions by wrapping around the support end...it's pretty easy and Risk has excellent directions here. The Speer 4-Wrap method is useful for webbing with a free end that doesn't use any hardware. You basically wrap the webbing around the tree several times, and each wrap adds surface area to create the friction that holds the hammock up. You have to alternate directions by wrapping around the support end...it's pretty easy and Risk has excellent directions here.The major advantage to this setup is that there are no moving parts to malfunction...it's very simple. The downsides to this method are that it isn't as easy to adjust as the others and a lot of webbing means more weight than a simple cord/hugger system (but still comparable to hardware-based systems). |
|
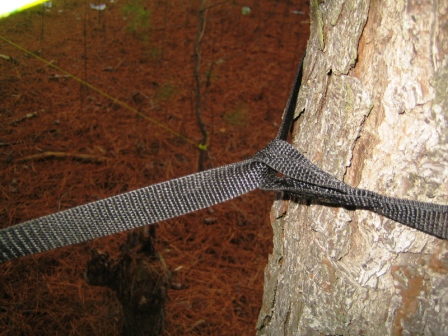
 The ideal for a 4-Wrap is to get ~4 wraps, but as long as you get enough friction it doesn't really matter how many you get. This one has about 2-1/2 wraps, but since it's a big tree it had plenty of friction to hold me up. You can finish a 4-Wrap with a half-hitch to the support, or just tuck it under one of the wraps like this. The ideal for a 4-Wrap is to get ~4 wraps, but as long as you get enough friction it doesn't really matter how many you get. This one has about 2-1/2 wraps, but since it's a big tree it had plenty of friction to hold me up. You can finish a 4-Wrap with a half-hitch to the support, or just tuck it under one of the wraps like this. |
|
| 3.3. Ring Buckles on Webbing |
|
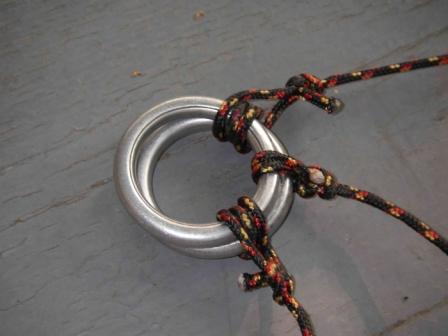
The concept behind ring buckles is simple - connect two rings together using a larkshead, and run the hammock support thru the rings just like an old fashioned belt or a motorcycle helmet. With strong enough webbing, the rings should create enough friction to hold a hammocker securely. I use 1" polypro webbing from Speer Hammocks and 4 x SMC Descending Rings with 1.5" internal diameter. SMC rings are available from many climbing shops, including REI. I connect the rings to the hammock with Air Core Plus from backpackinglight.com. See my step-by-step instructions if you want to make your own.
|
 Here's a picture of SMC descending rings as buckles, using Air Core Plus with larksheads at both ends to attach the rings to the hammock, and Ed Speer's 1" polypro webbing supporting the hammock from the tree. Here's a picture of SMC descending rings as buckles, using Air Core Plus with larksheads at both ends to attach the rings to the hammock, and Ed Speer's 1" polypro webbing supporting the hammock from the tree. |
 Some people say the webbing slips thru the ring buckles, and usually lowers them slowly to the ground. Putting a simple half-hitch in the webbing right behind the rings stops the webbing from slipping. This takes about 2 seconds and the system is still very easy to adjust...just pull the free end and the half-hitch slips right out for you to make the adjustment. Some people say the webbing slips thru the ring buckles, and usually lowers them slowly to the ground. Putting a simple half-hitch in the webbing right behind the rings stops the webbing from slipping. This takes about 2 seconds and the system is still very easy to adjust...just pull the free end and the half-hitch slips right out for you to make the adjustment.I've only had the webbing slip when it wasn't lined up correctly. If I take care to keep the webbing lined up thru the rings it's always held me steady. (Photo by slowhike) |
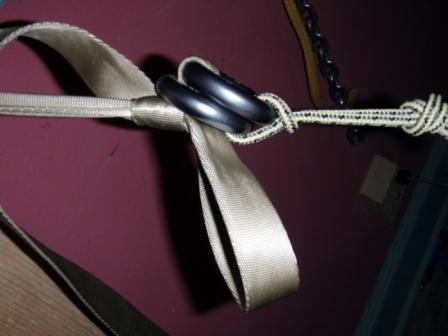
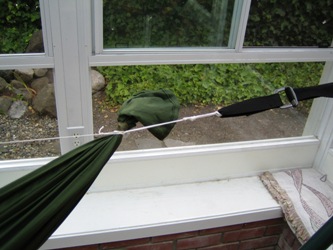
 Some people want to try the ring buckles before they permanently modify their hammock by cutting off the spectra. This picture shows how Miu attached ring buckles to her Hennessy to test out the buckles. Some people want to try the ring buckles before they permanently modify their hammock by cutting off the spectra. This picture shows how Miu attached ring buckles to her Hennessy to test out the buckles.Photo by Miu |
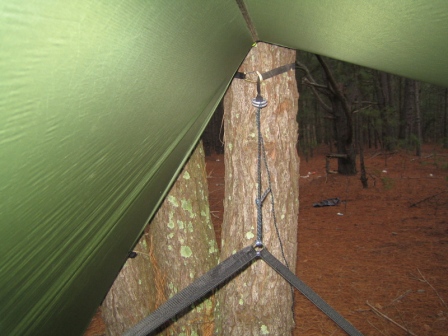
 Here is a ring buckle set on a JRB Bear Mountain Bridge Hammock (BMBH). I just put the rings on a tree hugger as shown here, then ran the stock BMBH webbing thru the rings. I didn't make any permanent modifications to the BMBH but I did need a tree hugger...these don't come with the BMBH so you can make your own or get them from a Hennessy. Here is a ring buckle set on a JRB Bear Mountain Bridge Hammock (BMBH). I just put the rings on a tree hugger as shown here, then ran the stock BMBH webbing thru the rings. I didn't make any permanent modifications to the BMBH but I did need a tree hugger...these don't come with the BMBH so you can make your own or get them from a Hennessy. |
 If you like this system, you can permanently modify your bridge hammock by putting the descending rings at the tip of the bridge's suspension triangle. This picture shows Grizzly Adams' DIY bridge with ring buckles. He's using webbing but the Garda Hitch will work just as well in this mode if you want to use cord. (Photo by Grizzly Adams) If you like this system, you can permanently modify your bridge hammock by putting the descending rings at the tip of the bridge's suspension triangle. This picture shows Grizzly Adams' DIY bridge with ring buckles. He's using webbing but the Garda Hitch will work just as well in this mode if you want to use cord. (Photo by Grizzly Adams) |
 Here's a close-up of the ring buckles on Grizz's bridge. The outer two pieces of cord are from the suspension triangle, and the middle one is for the ridgeline. (Photo by Grizzy Adams) Here's a close-up of the ring buckles on Grizz's bridge. The outer two pieces of cord are from the suspension triangle, and the middle one is for the ridgeline. (Photo by Grizzy Adams) |
| 3.4. Cinch Buckles on Webbing |
| Cinch buckles are another way to quickly adjust webbing suspension. Crazy Creek uses these buckles on their webbing, but I didn't like how their webbing system worked so I got some more buckles and made my own using a webbing adaptor. Blackbishop made some without a webbing adaptor and I like these better, if the cord is stiff enough to keep the buckle aligned.
Lots of hammockers prefer cinch buckles over ring buckles, even though they weigh a little more, because they never slip, the webbing doesn't misalign, and you don't need a half-hitch to back it up. Although I've never slipped with the ring buckles when the webbing was aligned, the cinch buckles seem a little more foolproof.
|
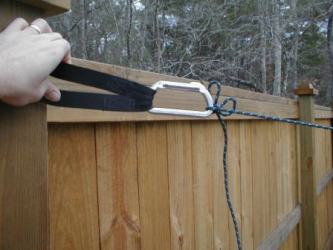
 This picture shows how I like the cinch buckle setup. I tie some Spyderline into a loop, then use a double-wrapped larkshead around the buckle. Then I add another larkshead to secure it to the hammock. When used with a biner on the tree, I never have to separate any of the pieces so I don't have to worry about leaving a strap behind, and setup/teardown is as quick as clicking two biners around the webbing. This picture shows how I like the cinch buckle setup. I tie some Spyderline into a loop, then use a double-wrapped larkshead around the buckle. Then I add another larkshead to secure it to the hammock. When used with a biner on the tree, I never have to separate any of the pieces so I don't have to worry about leaving a strap behind, and setup/teardown is as quick as clicking two biners around the webbing. |
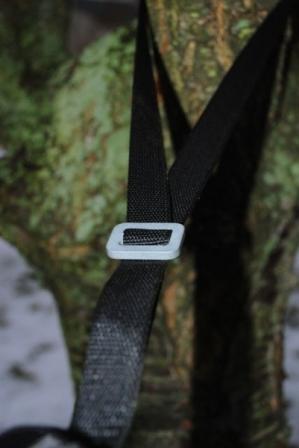
 Here's a closeup of the cinch buckle showing how the extra wraps keep the buckle aligned by not giving any room for the buckle to slip sideways. Here's a closeup of the cinch buckle showing how the extra wraps keep the buckle aligned by not giving any room for the buckle to slip sideways.Buy these buckles from Amazon: Cinch 1". Photo by angrysparrow |
 This is the first version I made, using a webbing adaptor to keep the buckle aligned. Step-by-step instructions here. This is the first version I made, using a webbing adaptor to keep the buckle aligned. Step-by-step instructions here. |
| 3.5. Tri-Glides on Webbing |
 Tri-Glides are a JacksRBetter product that allows use of 1" webbing without having to remove any pieces or adding the weight of rings or buckles. The webbing still has to be threaded thru the tri-glides for each setup so it isn't quite as quick as rings or cinch buckles, but at only 22 grams a set this is an excellent combination of simplicity, adjustability and weight. Tri-Glides are a JacksRBetter product that allows use of 1" webbing without having to remove any pieces or adding the weight of rings or buckles. The webbing still has to be threaded thru the tri-glides for each setup so it isn't quite as quick as rings or cinch buckles, but at only 22 grams a set this is an excellent combination of simplicity, adjustability and weight.Photo by cgul |
| Do You Need Webbing? |
| 4. Advanced Hanging Techniques. |
| 4.1. Two Hammocks Under One Tarp |
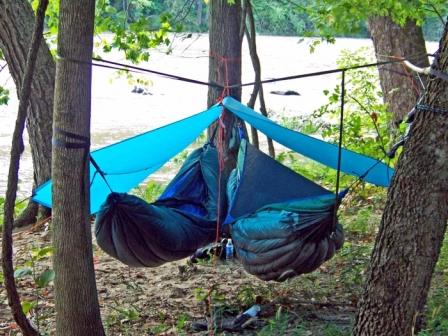
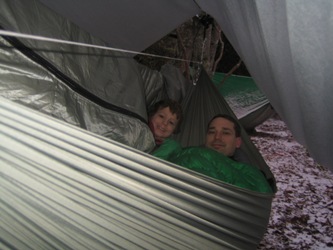
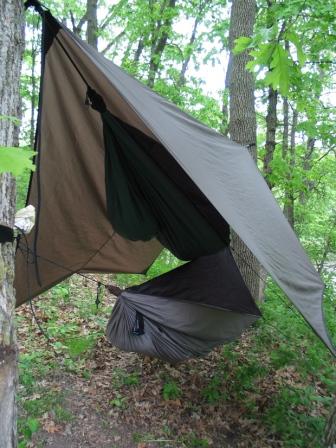
While the photo by Seuss to the left has the hammock tied to two different trees, I usually wrap my hammock off of one side of the tree and my son's hammock off the other side of the same tree. It's enough separation for us to be comfortable and I'm close enough to check on him during the night...make sure he's on his insulation, not sweating, etc. This picture is Joker (poking his head out of the Hammock Sock) and me at the 2007 Mt Rogers Hangout under a MacCat Standard tarp.
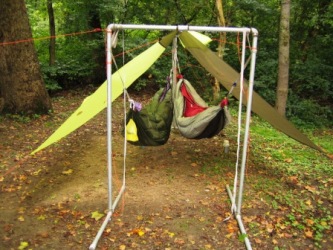 Here's a picture of Ed Speer's double hammock stand from the Sept 2006 SEHHA hangout in Hot Springs, NC. Here's a picture of Ed Speer's double hammock stand from the Sept 2006 SEHHA hangout in Hot Springs, NC. |
| FreeTheWeasel demonstrates how to hang two hammocks vertically on the same tree. If the tarp is big enough to provide coverage and you can get in, do what works! Photo by FreeTheWeasel |
| 4.2. Hanging in Trail Shelters |
| Hanging in shelters can be just as convenient for a hammocker as for a ground dweller, but it's important to remember the forces the supports can exert on the shelter's walls. If the shelter looks rickety, don't hang. And if it looks like it can support you, pick your supports carefully and listen for creaks. |
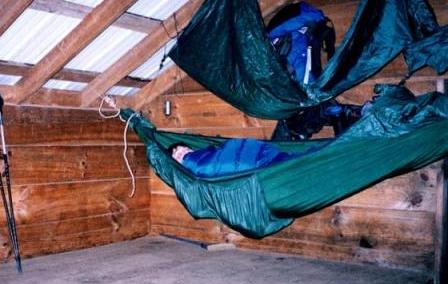 Clark Hammock in an AT Shelter photo by Hikerhead. Clark Hammock in an AT Shelter photo by Hikerhead.You should also be aware of what other hikers think about it...it's a pretty controversial topic on WhiteBlaze.net. The big thing is that you're not only putting your own safety at risk...if the shelter fails you hurt them as well, and the maintenance crew has to come build a new one, etc. |
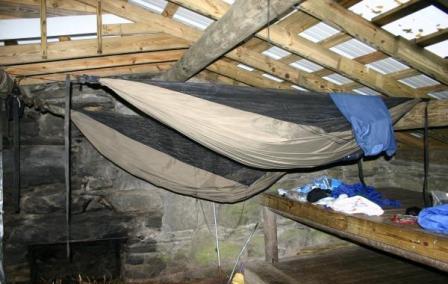 HHs in Tri-Corner Knob Shelter, GSMNP photo by Repeat. One advantage to others when you hang in a shelter, though, is that you're not taking up the floor space. No one may want to hang below you, but at least they can put a pack under you and you're not breathing in each others' faces. |
| 4.3. Hanging with Rock Climbing Gear. |
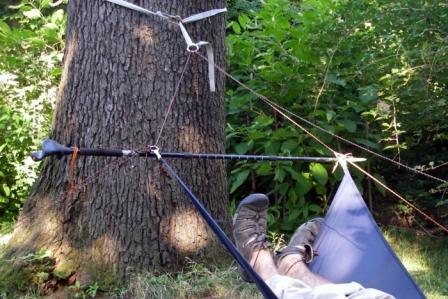
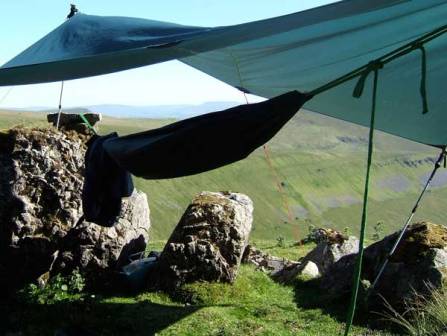 Photo by nigelp Photo by nigelpSome locations don't have many trees to hang from, so rock climbing nuts and cams can open up a whole new set of possible hanging sites. In this picture NigelP hangs with rock climbing gear. Check this HF thread for more discussion. |
 Photo from nigelp. Another view of his setup. Photo from nigelp. Another view of his setup. |
Top of Page | Site Map | Privacy Policy
© 2005 to Present | Email Me
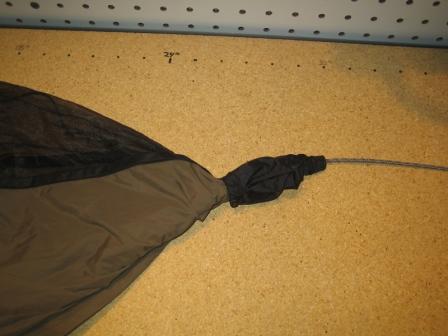
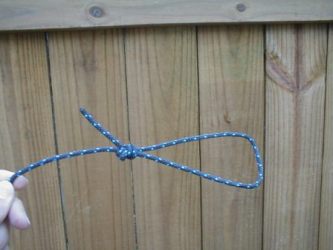 My Spectra supports are just 9' lengths of rope with a bight tied in the end. I attach the support to the hammock as described below, then use tree huggers and the Hennessy lashing (aka lineman's lashing or figure-8 lashing) to attach the support to the tree huggers.
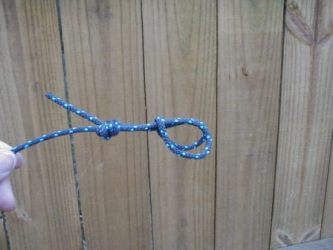 Second, form a larkshead in the end to slide the hammock into.
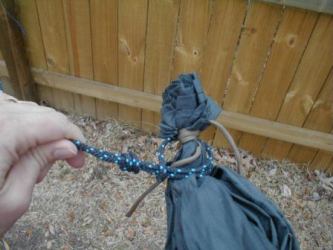 Third, slide the hammock end through the loop, ensuring the whipping is on the outside of the Spectra.
 Ring buckles attached to a Hennessy without making any permanent mods. The rings are clove hitched to the stock Hennessy spectra support.